My implementation of the 42 — push_swap project

- Published on

My implementation of the 42 — push_swap project
In this article, I will explain how I completed the push_swap project, a part of the common core of the 42 cursus. I won’t delve too deeply into the algorithm’s implementation, nor will I show you any of my code, but I want to provide you with an overview to inspire you, especially if you’re not sure how to start.
SOME CONTEXT:
This project will make you sort data on a stack, with a limited set of instructions, using the lowest possible number of actions. To succeed you’ll have to manipulate various types of algorithms and choose the one (of many) most appropriate solution for an optimized data sorting.
Here are the actions you can use:
sa, sb, ss to swap numbers, pa, pb to push them, and ra, rb, rra, rrb, rr, rrr to rotate piles.
You are allowed to organize your data into two piles: pile_a, which contains all the integers at the beginning of your program, and pile_b, which starts empty and should end empty as well.
As a side note: I don’t contextualize too much, for I assume that you already have an idea of what Push_swap is all about. You student right?
Fine. As with every 42 project, your algorithm’s performance will be evaluated by your peers. Performance, in this case, refers to the number of actions required to sort the list of integers provided as input. Your project will be graded based on the following criteria:
EVALUATION CRITERIA
SIMPLE VERSION:
algo must sort “2 1 0” in 2 or 3 instructions
algo must sort “1 5 2 4 3” in 12 instructions or less (extra kudos if you achieve fewer than 8 instructions :)
MIDDLE VERSION
algorithm must sort 100 random numbers
less than 700 instructions -> grade 5
less than 900 instructions -> grade 4
less than 1100 instructions -> grade 3
less than 1300 instructions -> grade 2
less than 1500 instructions -> grade 1
Advanced VERSION
algorithm must sort 500 random numbers
less than 5500 instructions -> grade 5
less than 7000 instructions -> grade 4
less than 8500 instructions -> grade 3
less than 10000 instructions -> grade 2
less than 11500 instructions -> grade 1
You may complete the bonus part ONLY IF your base project is perfect, which it will with the algorithm I provide (or any other worthwhile and your full dedication 😉).
By the way, the bonus part is relatively easy compared to the base project, and it would be a pity not to do it. Use get_next_line, and the job is done with no more than a single file. Beware of memory leaks.

So much for the introduction. Now is the time for me to explain how I tackled the beast…
Structuring the Data:
First, I needed to decide how to structure my data. While some of my fellow students opted for simple integer arrays, avoiding the difficulty brought by linked lists, I embraced complexity.
It was a perfect opportunity to deepen my understanding of a data structure that is way too valuable to be ignored in our curriculum. I began enhancing my libft, adding functions capable of creating, managing and disposing of circular doubly linked lists. Holy cow, what a ride.
Doubly linked lists are handy to traverse the list in both directions, and circular lists simplify operations like rotation: moving only one pointer does the trick.
One important part of the project before starting working on your sorting algorithm are the functions needed to execute the different instructions and reorder the piles accordingly. Make sure to test them before moving on.
One other critical point I want to pinpoint right now is about memory management: every calculation should be done on the stack. That goes without saying, but malloc as little as you can, or Valgrind will be your fiercest adversary.
In my Push_swap implementation, I allocated memory for my two piles, an integer array for the values and another one for the LIS and that’s it. Oh yeah, and a struct for some additional values here and there, but nothing too scary. This way, at the end of my program, or in case of unexpected behavior, a simple function free_all(things, to, free) kept Valgrind happy. Replace ‘things’ ‘to’ or ‘free’ ny NULL, in case they weren’t allocated yet.

Tools You Can Use
To develop this algorithm I used mainly two tools:
a random number generator (you’ll find many online, I used this one)
push_swap visualizer : very very very useful repo to see how your algorithm handles your piles. Perfect for optimization and problems spotting. You get to know your algorithm performances as well and you can generate random numbers directly from this tester. Get it from here (link).
Now, let’s take a look at my algorithm.
My Push_Swap Algorithm In Four Steps
Step One: get the Longest Increasing Subsequence (LIS)
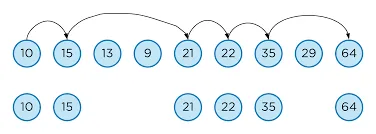
One unique aspect of my approach is that I calculate the Longest Increasing Subsequence (LIS) of pile_a. Longest Increasing Subsequence?

It’s essentially the longest sorted list within another list of integers. This way, I know that they are already in place, and I don’t touch them in the next steps of my algorithm.
You might say that there’s no point doing it since it is only a minor improvement that does not greatly improve the performance of the algorithm on bigger lists of integers, but it’s working great for smaller inputs. And knowing how to calculate it might be useful in other situations, don’t you think?
Now, how do I get it? Calculating the LIS can be complex, and I won’t go into the details here. I suggest referring to the resources I used for guidance.
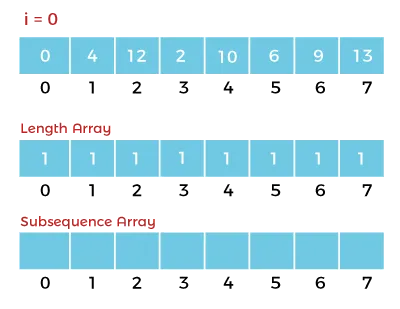
First I get the length of the LIS. You get the logic from ‘Take U forward,’ who provides a simple explanation on Youtube [link] on how to get it through binary search.
This length can help you when implementing the calculation of the LIS with Dynamic Programming, an algorithm rather easy to understand and thoroughly explained by vivekanand khyade on Youtube as well (link).
There might be other resources online to calculate the LIS on your own way, be curious and investigate.

Step Two: Push All The Non-LIS Numbers to Pile_b
As a second step, I push every number that is not part of the LIS to pile_b. But before that, I calculate a pivot number to pre-sort my data. Nothing too fancy: create a tab the size of pile_a, copy all your numbers in it and sort them (bubble sort works fine). Take the value at the middle index and there you go.
Next, I push all values superior to this pivot to the upper part of pile_b (instruction “pb”), while all other values go to the lower part (instructions pb + rrb). Remember NOT to push the values from the previously computed LIS.
This process results in pile_a containing sorted values and pile_b with pre-sorted values.
Step Three: Push Back to Pile_a (Orderly)
This is a critical part of the algorithm. With the piles organized as they are, the goal is now to push all numbers back to pile_a in an orderly manner. To do this, you’ll have to calculate. Again and again. That’s what computers do best. And we love them for that.
For each element of pile_b, I calculate how many moves it will take to move it from its position in pile_b to the position it belongs to in pile_a:
How many rotations do I need in pile_b to get the element to the top? (remember that you can rotate the pile in both directions, and an element at the base of the pile can “cost” less to move than one at the top).
How many rotations do I need in pile_a to get the element immediately inferior to the element in question to the top?
Of course, you update a variable of the cost (in move number) of the current “winner” during the process to avoid unnecessary calculations. Say for instance that you already found a candidate that only takes two moves to get to its target position, you stop calculating past that point for all other candidates. If one candidate only takes one move, stop calculation immediately and push.
Once you know which element costs the least to move from b to a, you only need to convert the rotations needed to instructions.
The way I do this is quite simple. I use a variable to store the rotations needed on both piles: positive values to rotate and negative values to reverse rotate.
So for example, if I have my variable instructions_tab[2] with the values 3 and 2, it means that I need to rotate pile_a 3 times and rotate pile_b twice, which results in the instruction set rr, rr, ra. Indeed, ra + rb = rr 🙂
Another example: if I have my variable instructions_tab[2] with the values -2 and 1, it means that I need to reverse rotate pile_a twice and rotate pile_b once, which results in the instruction set rra, rra, rb. A single pa to push the node back where it belongs and your loop may start the calculation for the next move. You get the idea.

Step Four: Rotate Pile_a To Get Lowest Number To The Top
The title of this section is self explanatory, and you should check whether you’d better reverse rotate instead of rotating pile_a to get the lowest number to the top quicker. Yes, you’ll have to add some logic to identify the fastest way to completion.
Conclusion
Voilà, there you have it.
One additional feature I implemented to meet all evaluation criteria for smaller integer sets is a function to check whether pile_a is in complete reversed order at the very beginning (say, for example “5 4 3 2 1”). In such cases, I start by swapping its first two elements. This increases the size of the LIS from 1 to 3. Sparing some instructions.
This approach eliminates the need to code specific logic for sorting a three-number pile since my algorithm takes care of it.
I understand that this article may seem somewhat challenging to fully grasp, but I hope it has inspired you to start your project. My goal is for you to implement it in a way that deepens your understanding of its fundamental concepts.
With that said, enjoy your coding journey, and have a great time tackling the push_swap project!